alexgorbatchev

Saturday, January 23, 2016

Spring Cloud - Config Server


Setting up the Spring Cloud Config Server

In this post we will be setting up a Spring Cloud Config Server to externalize configuration properties for future Grails 3 applications.  This will be a bare bones application without security for now.

Setup

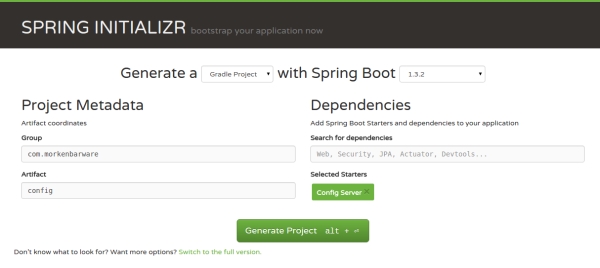
The easiest method to get started is to create a Spring Boot application from the Spring Initializr and include the Spring Cloud Config Server.  I will be using a Gradle project and Spring Boot 1.3.2.  Enter your desired group (com.morkenbarware) and artifact (config) in the Spring Initializr and download a new project.

Spring Initializr

Configuration

Configuration changes to this ConfigApplication will be pretty minimal as most of the default Boot application settings will be sufficient for now, but we do need to add an annotation and a few config settings to enable the configuration endpoints.

Annotation:

In order to enable the configuration endpoints that other applications will use, we need to add one annotation to the Application class (ConfigApplication) in the application.

Add the import import org.springframework.cloud.config.server.EnableConfigServer; and the annotation @EnableConfigServer to the Application (ConfigApplication) class as follows:


Configuration Settings:

Spring Cloud Config Server primarily uses Git repositories to store properties, so we first need to create a new Git repository to hold our application properties.

Create Local Git Repository (to hold our external properties)

In production this would probably be a web-based Git repo or at least a remote repo, but for simplicity, I will create a local repo to hold my configuration information.  I keep all of my development projects in a projects folder under my user directory, so my config repo will be in /home/me/projects/config.  In this directory, create a file application.properties or application.yml depending on your configuration preference.

In addition to the application.properties or yml file create another file called example.properties or example.yml depending on your configuration preference.
Once these two files have been created, commit the changes (git commit -am 'initial properties') to the Git repo.

By adding an application.properties/yml file to the repo, any Cloud Config Client application that connects to this Config Server will receive these properties unless overriden by a more specific property/yml file.  In our case, when we specify:
 audit.config.source = cloud in the application.yml and
 audit.config.source = cloud example in the example.yml file,
if we create an application called example, it will receive "cloud example" because the example.yml file is more specific to that application. (application.yml > example.yml > example-production.yml)

Config Server Settings:

Next, we need to configure the actual Config Server Application.  We need to "connect" to our local Git repo using spring.cloud.config.server.git.uri and expose the config server on the conventional cloud config port 8888 using server.port. Your application.properties/yml should look like the following.


With that done... let's fire up the config server and see what we have accomplished.
./gradlew bootRun

After executing the gradle task, you should see a lot of output and eventually something that says:
Tomcat started on port 8888.  If you go to the running application and change the url to http://localhost:8888/example/development/ you should see two different property values for audit.config.source and if you go to http://localhost:8888/someapp/development/ you will only see one audit.config.source from application.properties that applies to all applications.

Next, we will create a Grails 3 application to connect to our Cloud Config Server and see how they work together.

References:
  • http://cloud.spring.io/spring-cloud-config/spring-cloud-config.html

Tuesday, August 18, 2015

Grails 3 and Spring Security Plugin

A huge thanks to Burt Beckwith and others for their work on the Spring Security Plugin for Grails 3!

For more information, see the Grails documentation http://grails-plugins.github.io/grails-spring-security-core/guide/newInV3.html or the github repository https://github.com/grails-plugins/grails-spring-security-core

Friday, May 29, 2015

Grails 3 App with Security (Part 3) - Password Encoding with Bcrypt

This is the third post in the Grails 3 App with Security series, so if you have questions about dependencies, please consult the the first and second posts. In this post we will be adding BCrypt password encoding to our GORM-based user and authentication provider. As for the previous steps, my github repository for this series https://github.com/dspies/grails-3-with-security contains a tag ('GORM-based auth with bcrypt') with this code below.

To demonstrate that the application is encoding the password with BCrypt we will use the dbConsole provided in Grails. However, this interface uses frames and does not handle CSRF tokens, so we need to do a little configuration to display the dbConsole. I would suggest reverting these changes if you plan to put your application into production as they disable CSRF and frame protection. With those warnings in place, let's make the changes.

grails-app/init/simpleappwithsecurity/SecurityConfiguration.groovy

At this point, when you run the app you should be able to navigate to http://localhost:8080/dbconsole/ and see the H2 web-client. Change the JDBC URL if necessary to connect to the in-memory database (Mine is jdbc:h2:mem:devDb;MVCC=TRUE;LOCK_TIMEOUT=10000;DB_CLOSE_ON_EXIT=FALSE) and connect. Now inside the H2 client, when you look at the records in the USER table, you will see the passwords are stored in plain-text. That is not good, but easily fixed.

Adding Password Encoding (BCrypt)

In order to add password encoding to our application, we need to do 3 things:

  1. Create a password encoder bean
  2. Add code to encode our passwords when creating/updating user's passwords
  3. Tell our authentication provider what password encoding we are using, so it can appropriately match existing passwords

Create a Password Encoding bean

Spring Security already comes with a BCrypt password encoder, so we just need to wire it up in our Spring beans. Add the following code to resources.groovy

grails-app/conf/spring/resources.groovy

Encode passwords when creating/updating user's passwords

Next, we need to utilize this bean when creating a user or updating a user's password. Again, we will raid the Spring-Security-Core plugin from Grails 2, and add some code to the insert and update hooks provided by GORM to encode the user's password before saving/updating the user object.

grails-app/domain/example/User.groovy

Configure Authentication Provider

Finally, we need to tell the authentication provider what password encoding we are using, so it can appropriately match the user credentials when they try to authenticate. Fortunately, all we have to do is add a few lines to the SecurityConfiguration and we are done.

grails-app/init/simpleappwithsecurity/SecurityConfiguration.groovy

Monday, May 11, 2015

Grails 3 App with Security (Part 2) - Gorm-based authentication

This is the second post in the Grails 3 App with Security series, so if you have questions about dependencies, please consult the first post. In this post we will setting up Spring Security in Grails 3 using Gorm-based authentication and after finishing, I'll think be happily surprised at just how easy it is to add Gorm. Unfortunately, my laptop crashed while creating this post, so if you come across any issues with the code samples or have found a better method for anything I have presented, please provide a comment at the bottom. The github repository https://github.com/dspies/grails-3-with-security with this code will be updated shortly.

Before we begin, let's get some clean up out of the way. Grails 3 (or more specifically Spring Boot) will scream at you about having second level cache enabled, but not configured after you add the Gorm classes, so let's just disable second level cache for now. I added the following just before the datasource properties, but you are welcome to add it anywhere in application.yml or configure second level cache as needed.

grails-app/conf/application.yml

...

hibernate:
    cache:
        use_second_level_cache: false
        use_query_cache: false

---
datasource:
...

With that out of the way, let's begin by adding our Gorm domain classes (User, Authority, and UserAuthority). If you have been using Spring-Security-Core plugin for any length of time, the following classes should look pretty familiar because I basically copied from the Grails 2 plugin.

grails-app/domain/example/User.groovy

package example

class User {

    String username
    String password
    boolean enabled = true
    boolean accountExpired
    boolean accountLocked
    boolean credentialsExpired

    static constraints = {
        username blank: false, unique: true
        password blank: false
    }

    static mapping = {
        password column: '`password`'
    }

    Set getAuthorities() {
        UserAuthority.findAllByUser(this).collect { it.authority }
    }

} // Blogger really wants to close the authority 'tag', so here go Blogger 

grails-app/domain/example/Authority.groovy

package example

class Authority {

    String authority

    static mapping = {
        cache true
    }

    static constraints = {
        authority blank: false, unique: true
    }
}

grails-app/domain/example/UserAuthority.groovy

package example

import org.apache.commons.lang.builder.HashCodeBuilder

class UserAuthority implements Serializable {

    private static final long serialVersionUID = 1

    User user
    Authority authority

    boolean equals(other) {
        if (!(other instanceof UserAuthority)) {
            return false
        }

        other.user?.id == user?.id &&
            other.authority?.id == authority?.id
    }

    int hashCode() {
        def builder = new HashCodeBuilder()
        if (user) builder.append(user.id)
        if (authority) builder.append(authority.id)
        builder.toHashCode()
    }

    static UserAuthority get(long userId, long authorityId) {
        UserAuthority.where {
            user == User.load(userId) &&
            authority == Authority.load(authorityId)
        }.get()
    }

    static boolean exists(long userId, long authorityId) {
        UserAuthority.where {
            user == User.load(userId) &&
            authority == Authority.load(authorityId)
        }.count() > 0
    }

    static UserAuthority create(User user, Authority authority, boolean flush = false) {
        def instance = new UserAuthority(user: user, authority: authority)
        instance.save(flush: flush, insert: true)
        instance
    }

    static boolean remove(User u, Authority r) {
        if (u == null || r == null) return false

        int rowCount = UserAuthority.where {
            user == User.load(u.id) &&
                    authority == Authority.load(r.id)
        }.deleteAll()

        rowCount > 0
    }

    static void removeAll(User u) {
        if (u == null) return

        UserAuthority.where {
            user == User.load(u.id)
        }.deleteAll()
    }

    static void removeAll(Authority r) {
        if (r == null) return

        UserAuthority.where {
            authority == Authority.load(r.id)
        }.deleteAll()
    }

    static constraints = {
        authority validator: { Authority r, UserAuthority ur ->
            if (ur.user == null) return
            boolean existing = false
            UserAuthority.withNewSession {
                existing = UserAuthority.exists(ur.user.id, r.id)
            }
            if (existing) {
                return 'userAuthority.exists'
            }
        }
    }

    static mapping = {
        id composite: ['authority', 'user']
        version false
    }
}

With the domain classes for our principal/user and authorities/roles in place, let's load two users, user and admin. You could add these in the SecurityConfiguration class, but since most people reading this will be more familiar with Bootstrap, we'll go that route.

Bootstrap.groovy

import example.*
import grails.util.Environment

class BootStrap {

    def init = { servletContext ->

        switch (Environment.current) {
            case Environment.DEVELOPMENT:

                def user = new User(username: 'user', password: 'user', enabled: true, accountExpired: false, accountLocked: false, credentialsExpired: false ).save(failOnError: true)
                def admin = new User(username: 'admin', password: 'admin', enabled: true, accountExpired: false, accountLocked: false, credentialsExpired: false ).save(failOnError: true)

                def roleUser = new Authority(authority: 'ROLE_USER').save(failOnError: true)
                def roleAdmin = new Authority(authority: 'ROLE_ADMIN').save(failOnError: true)

                UserAuthority.create(user, roleUser, true)
                UserAuthority.create(admin, roleUser, true)
                UserAuthority.create(admin, roleAdmin, true)

                break
            case Environment.PRODUCTION:

                break
        }
    }
    def destroy = {
    }
}

At this point, we have not accomplished much in terms of authentication, so let's change that now. In order to use the domain classes above, we need to:

  • Create a custom UserDetails class,
  • Create a custom UserDetailsService,
  • Add a bean for userDetailsService in resources.groovy, and
  • Configure authentication with the bean in the SecurityConfiguration class

First, let's create a GrailsUser that will do little more than extend Spring Security User class. The one thing it adds is the `id` field that will hold the Gorm identifier for the User class. Again, we will raid the Spring-Security-Core plugin from Grails 2:

src/main/java/example/GrailsUser.java

package example;

import org.springframework.security.core.GrantedAuthority;
import org.springframework.security.core.userdetails.User;

import java.util.Collection;

public class GrailsUser extends User {

    private static final long serialVersionUID = 1;

    private final Object id;

    /**
     * Constructor.
     *
     * @param username the username presented to the
     *        DaoAuthenticationProvider
     * @param password the password that should be presented to the
     *        DaoAuthenticationProvider
     * @param enabled set to true if the user is enabled
     * @param accountNonExpired set to true if the account has not expired
     * @param credentialsNonExpired set to true if the credentials have not expired
     * @param accountNonLocked set to true if the account is not locked
     * @param authorities the authorities that should be granted to the caller if they
     *        presented the correct username and password and the user is enabled. Not null.
     * @param id the id of the domain class instance used to populate this
     */
    public GrailsUser(String username,
                      String password,
                      boolean enabled,
                      boolean accountNonExpired,
                      boolean credentialsNonExpired,
                      boolean accountNonLocked,
                      Collection authorities,
                      Object id) {
        super(username, password, enabled, accountNonExpired, credentialsNonExpired,
                accountNonLocked, authorities);
        this.id = id;
    }

    /**
     * Get the id.
     * @return the id
     */
    public Object getId() {
        return id;
    }
}

Next, we will create our custom UserDetailsService. Like the domain classes and UserDetails class, there is no point writing something that someone else has already done better, so we will use the UserDetailsService from the Spring-Security-Core plugin in Grails 2.

grails-app/services/example/GormUserDetailsService

package example

import grails.transaction.Transactional
import org.springframework.security.core.userdetails.UserDetails
import org.springframework.security.core.userdetails.UserDetailsService
import org.springframework.security.core.userdetails.UsernameNotFoundException
import org.springframework.security.core.GrantedAuthority
import org.springframework.security.core.authority.SimpleGrantedAuthority

@Transactional
class GormUserDetailsService implements UserDetailsService {

    @Transactional(readOnly = true, noRollbackFor = [IllegalArgumentException, UsernameNotFoundException])
    UserDetails loadUserByUsername(String username, boolean loadRoles) throws UsernameNotFoundException {

        def user = User.findWhere(username: username)
        if (!user) {
            log.warn "User not found: $username"
            throw new UsernameNotFoundException('User not found')
        }

        Collection authorities = loadAuthorities(user, username, loadRoles)
        createUserDetails user, authorities
    }

    UserDetails loadUserByUsername(String username) throws UsernameNotFoundException {
        loadUserByUsername username, true
    }

    protected Collection loadAuthorities(user, String username, boolean loadRoles) {
        if (!loadRoles) {
            return []
        }

        Collection userAuthorities = user.authorities
        def authorities = userAuthorities.collect { new SimpleGrantedAuthority(it.authority) }
        return authorities ?: [NO_ROLE]
    }

    protected UserDetails createUserDetails(user, Collection authorities) {
        new GrailsUser(user.username, user.password, user.enabled, !user.accountExpired, !user.credentialsExpired,
                !user.accountLocked, authorities, user.id)
    }
}  //Blogger now wants to close the GrantedAuthority 'tag', so 

Next, let's add a userDetailsService bean to resources.groovy for the GormUserDetailsService. Adding a bean to resources.groovy will take care of adding a Hibernate session and transaction to the service and allow us to use Gorm classes in the service.

grails-app/conf/spring/resources.groovy

import example.GormUserDetailsService
import simpleappwithsecurity.SecurityConfiguration

beans = {
    webSecurityConfiguration(SecurityConfiguration)
    userDetailsService(GormUserDetailsService)
}

Finally, let's replace the code for in-memory authentication:

grails-app/init/simpleappwithsecurity/SecurityConfiguration.groovy

    @Autowired
    protected void globalConfigure(AuthenticationManagerBuilder auth) throws Exception {
        auth
            .inMemoryAuthentication()
                .withUser('user').password('user').roles('USER')
                .and()
                .withUser('admin').password('admin').roles('ADMIN');

with our shiny GormUserDetailsService

grails-app/init/simpleappwithsecurity/SecurityConfiguration.groovy

import org.springframework.security.core.userdetails.UserDetailsService;
    ...
    
    @Autowired
    UserDetailsService userDetailsService
    
    @Override  
    protected void configure(HttpSecurity http) throws Exception {  
        http  
            .authorizeRequests()  
                .antMatchers('/admin/**').hasAnyRole('ADMIN')  
                .antMatchers('/home/**').hasAnyRole('USER', 'ADMIN')  
                .antMatchers('/').permitAll()  
            .and()  
                .formLogin().permitAll()  
            .and()  
                .logout().permitAll()  
    }
    
    @Autowired
    protected void globalConfigure(AuthenticationManagerBuilder auth) throws Exception {
        auth.userDetailsService(userDetailsService)
    }

Now fire up the app and you should be able to authenticate against the Gorm domain classes

Adding Password Encoding

The next post handles adding a password encoder (BCrypt) to the application
Friday, March 6, 2015

Grails 3 App with Security (Part 1)

The great Spring Security Plugin is now available for Grails 3!

I will leave these blog posts up as a reference, but I would strongly suggest (as if you needed the suggestion) to use the Spring-Security plugin for Grails 3

Since Spring Security Core Plugin is not was not working for Grails 3, and I could not find any other resources for the spring-boot-starter-security related to Grails 3 I decided to share what I did to get up and going. I created a github project at https://github.com/dspies/grails-3-with-security and tagged each step if you want to follow along.
Uses:
  • Grails Version: 3.0.0.M2
  • Groovy Version: 2.4.1
  • JVM Version: 1.7.0_51

Setting up Security:

Simply add the following to build.gradle in the dependencies:
compile "org.springframework.boot:spring-boot-starter-security"
This will cause ALL HTTP endpoints to require authorization and a random password to be generated each time you start up your app. Also, because Spring-Boot-Security-Starter logs the randomly generated password at level INFO, you need to add the following to your logback.groovy file.
 //see http://logback.qos.ch/manual/groovy.html for more info
 logger('org.springframework.boot.autoconfigure.security', INFO)
This is not sufficient for anything but a demo, so let's customize it a bit. Let's start with the easiest part, creating a fixed password. There are a few methods of setting a static password, but we'll concentrate on two 1) in the application.yml or 2) in a WebSecurityConfigurerAdapter Class.

In the Application.yml file

    security:
        user:
            password: password

In a WebSecurityConfigurerAdapter Class

Using a WebSecurityConfigurerAdapter class, we can override the default implementation(s) used in spring-boot-starter-security.

grails-app/init/simpleappwithsecurity/SecurityConfiguration.groovy
package simpleappwithsecurity

import org.springframework.beans.factory.annotation.Autowired
import org.springframework.context.annotation.Configuration
import org.springframework.security.config.annotation.authentication.builders.AuthenticationManagerBuilder
import org.springframework.security.config.annotation.web.configuration.EnableWebSecurity
import org.springframework.security.config.annotation.web.configuration.WebSecurityConfigurerAdapter;

@Configuration
@EnableWebSecurity
class SecurityConfiguration extends WebSecurityConfigurerAdapter {

    @Autowired
    public void configureGlobal(AuthenticationManagerBuilder auth) throws Exception {
        auth
                .inMemoryAuthentication()
                .withUser("user").password("pwd").roles("USER");
    }
}
One important note, Grails does NOT know anything about the SecurityConfiguration class unless you do something to tell your Grails' app about the new class. The two easiest methods are to specify a bean in resources.groovy
grails-app/conf/spring/resources.groovy
import simpleappwithsecurity.SecurityConfiguration

beans = {
    webSecurityConfiguration(SecurityConfiguration)
}
If you use this, you do not need the class annotations @Configuration and @EnableWebSecurity on the SecurityConfiguration class. Another method is to enable Spring's Component Scan on the Grails application in the Application.groovy file by adding @ComponentScan to the Application class, such as
grails-app/init/Application.groovy

...
import org.springframework.context.annotation.ComponentScan;

@ComponentScan
class Application extends GrailsAutoConfiguration {
...
I think this depends on how you view your application. If it is a Grails Application, using primarily Grails Plugins with Spring sprinkled in, then use the first method. If it is a Spring Boot application with Grails sprinkled in, use the latter method. For now, our app is a Grails app, so we'll use the bean definition in resources.groovy.

Securing specific URIs (or request maps)

Let's extend our example by adding pattern matches to our SecurityConfiguration class.
grails-app/init/simpleappwithsecurity/SecurityConfiguration.groovy
...
    @Override
    protected void configure(HttpSecurity http) throws Exception {
        http
            .authorizeRequests()
                .antMatchers('/admin/**').hasAnyRole('ADMIN')
                .antMatchers('/home/**').hasAnyRole('USER', 'ADMIN')
                .antMatchers('/').permitAll()
            .and()
                .formLogin().permitAll()
            .and()
                .logout().permitAll()
    }

    //<-- --="" .inmemoryauthentication="" .withuser="" auth="" code="" configureglobal="" end="" exception="" in="" of="" password="" previous="" public="" roles="" snippet="" throws="" user="" uthenticationmanagerbuilder="" utowired="" void="">
                .and()
                .withUser('admin').password('admin').roles('ADMIN');
    }

...
Restarting the application now will allow you to see the index page, but require authentication when attempting to access /home or /admin controllers.

Resources:

Thursday, April 3, 2014

Grails Gotchas: Configuration Files and GStrings

Configuration Files

Be careful in defining configuration information using double quotes, because if the value you are attempting to assign contains a dollar sign ($), grails will see that as a variable and attempt to substitute the letters/words following the dollar sign with variable information for those letters/words. While this situation probably only presents itself with passwords, I always use single quotes defining information in the configuration files, unless I explicitly want to inject variable data into a configuration attribute, so there is no confusion.

For example, the following error-causing configuration
datasource {
  ...
  password = "Thi$i$Secure"
  ...
}
would probably result in password = 'Thi', unless you defined an i or Secure variable somewhere else in the configuration file, in which case, you would assign the result of evaluating that information too.

Instead, I would suggest that you always specify your configuration information in single quotes
datasource {
  ...
  password = 'Thi$i$Secure'
  ...
}

For sake of completeness, you could alternatively escape the dollar sign ($)
datasource {
  ...
  password = "Thi\$i\$Secure"
  ...
}
however, this leaves the possibility for errors that may not be easy to spot. Especially, if you have an externalized config and this error arises in production.

Wednesday, March 12, 2014

Webstorm and Karma in Ubuntu 12 LTS

If you are attempting to run Karma unit tests from Webstorm in Ubuntu 12LTS you may run into the following error:
Cannot start Chrome
 Can not find the binary google-chrome
 Please set env variable CHROME_BIN
Attempting to export CHROME_BIN=/usr/bin/chromium-browser worked great for running karma from the command line, but did not fix my issue when running it from within Webstorm, so after a bit of searching I found that you can add environment variables to webstorm by editing the Run/Debug Configurations for Karma:
  1. Under Run > Edit Configurations...
  2. Select Karma > karma.conf.js 
  3. Add the Environment Variables:
    CHROME_BIN=<path to chromium-browser>
    • To find the location of chromium-browser:
      which chromium-browser